⭐⭐💙⭐⭐

Ce quilt a la particularité d'être réversible :
This quilt has the particularity of being reversible:
Je vous raconte tout ! Attention, c'est une longue histoire 😊
I'll tell you all about it! Warning, it's a long story 😊
⭐⭐➕⭐⭐
Je ne l'ai commencé qu'en mai 2023, après avoir enfin acheté les tissus qu'il voulait, dans les tons marrons et bleus.
Seuls le tissu turquoise et le jaune viennent de mon stock. J'ai bien essayé de lui proposer d'autres combinaisons de couleurs avec mon stock de tissus, mais ça n'a pas marché 😇
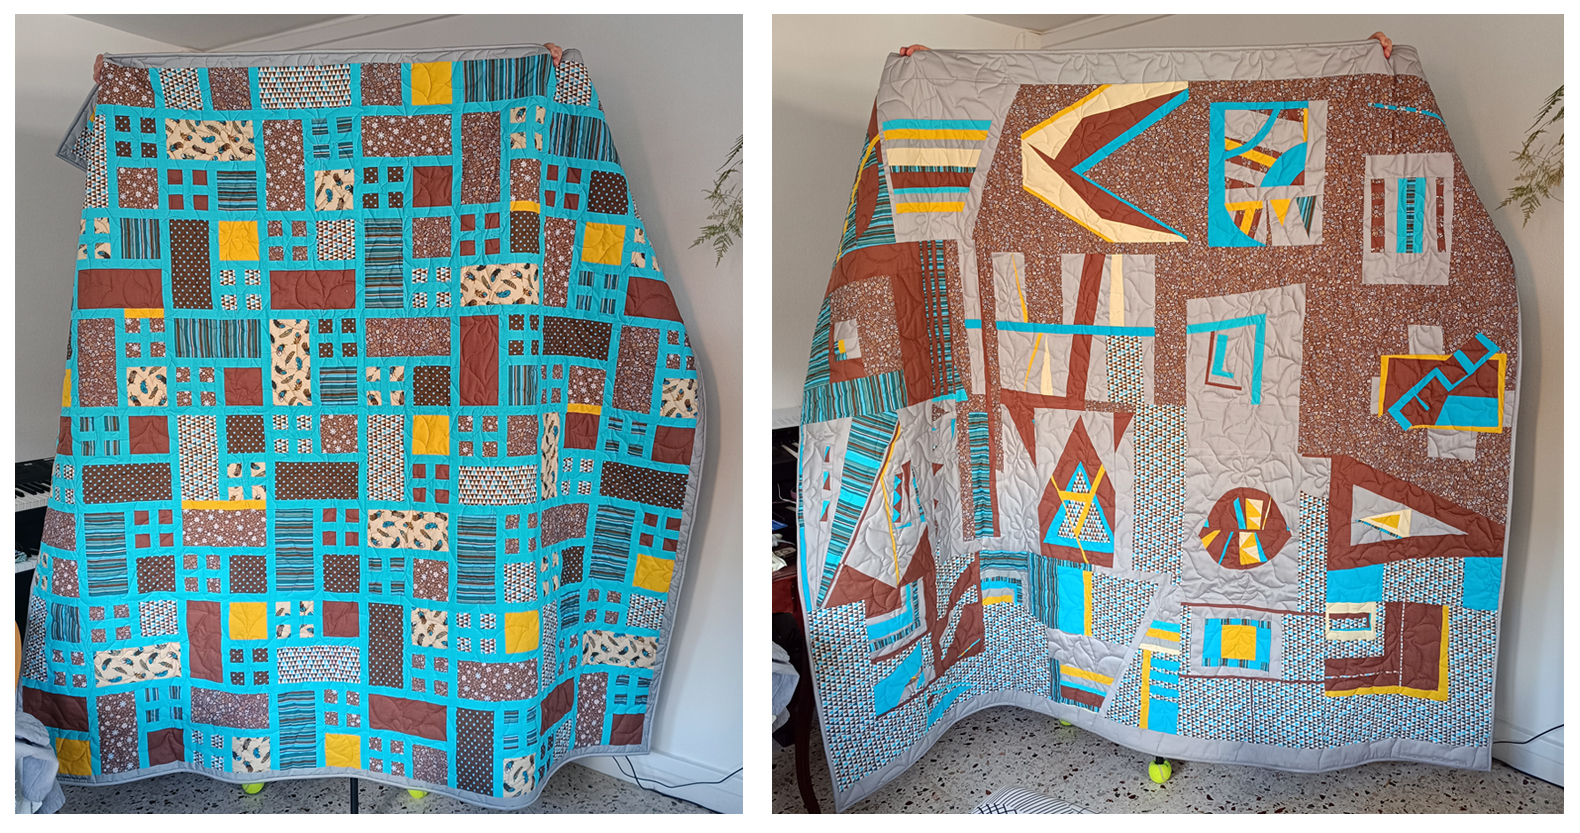
It all began in 2018 when François saw this quilt in Sainte-Marie-aux-Mines, at the European Patchwork Meeting. The pattern is by Monica Solorio-Snow of Happy Zombie. He wanted it for our bed, so it's a large quilt: 81'' x 76''.
I didn't start it until May 2023, after finally buying the fabrics he wanted, in brown and blue tones.
Only the turquoise fabric and the yellow came from my stash. I tried to suggest other color combinations from my stash, but I didn't succeed 😇

L'ajout d'un accent, le jaune, est mon idée. J'aime trop ces deux couleurs ensemble, 💛 et 💙, et avec le marron ça allait plutôt bien. François a adhéré dans la mesure où il n'y en avait pas trop : une petite douzaine de carrés 😋

Et heureusement, parce que c'est en fait ce qui m'a sauvé : le métrage de tissu turquoise était important, je pensais en avoir suffisamment pour tous les blocs et toutes les bordures, mais non... Grâce au jaune, j'ai pu compléter les bandes intermédiaires 😏
And fortunately, because that's actually what saved me: the yardage of turquoise fabric was large, I thought I'd have enough for all the blocks and borders, but no... Thanks to the yellow, I was able to complete the sashings 😏

Dans la photo ci-dessous 👇, vous pouvez voir les 4 "raccords" : les fines bandes jaunes dans les bordures bleues verticales. Je suis assez contente du résultat !
Sur le mur j'ai commencé par positionner les morceaux jaunes en face de blocs, pas trop près des carrés jaunes pour répartir la couleur, puis j'ai complété avec mes dernières bandes de bleu.
J'avais prévu un peu plus de bandes jaunes, mais finalement, ouf, il ne manquait pas tant de tissu turquoise que ça !
In the photo below 👇, you can see the 4 "fittings": the thin yellow stripes inside the vertical blue sashings. I'm pretty happy with the result!
On the design wall I started by positioning the yellow pieces facing blocks, not too close to the yellow squares to spread the color, then completed with my last strips of blue.
I'd anticipated a few more yellow strips, but in the end, phew, there wasn't that much turquoise fabric missing!

⭐⭐💙⭐⭐
Au moment où j'allais m'occuper du dos, le challenge "30 Days of Improv" de Shannon et Amanda en était à sa 2e semaine. C'est un des QAL que j'avais repéré dans ma liste des challenges à venir, et auquel j'avais vraiment envie de participer.
Et pourquoi ne pas profiter de ce challenge pour me lancer dans l'impro, et aussi utiliser ces blocs dans un projet précis ? Allez hop, en route pour une nouvelle aventure !
Pour que les deux faces aient la même dimension (avec le dos un peu plus grand pour faciliter le quilting), j'ai ajouté une bordure grise autour du top, et sur 3 cotés du dos.

Le voilà prêt pour le quilting !
J'avais pensé à un quilting simple, en lignes droites le long des blocs. Et puis au hasard de mes navigations sur le net, j'ai vu ce motif de fleur, en ligne continue : Plumeria. C'est un modèle gratuit de Urban Elementz. Ah ben tiens, pourquoi pas ?


Le crayon porte-craie est fourni avec des "mines" de craie blanche, rouge et bleue. La rouge se voit bien, même sur le tissu marron, et ne part pas facilement (il faut gommer ou laver pour que les lignes s'effacent).

Avant de commencer à quilter, petit entraînement du mouvement des mains pour guider le quilt sous l'aiguille de la machine, en piqué libre, le long du tracé.
Pour ce motif, j'ai utilisé un fil Gütermann 65/2 marron, le même en bobine et canette.


J'ai rassemblé mes dernières pièces de tissu gris pour faire la bande de finition. Et quand je dis dernières, c'est que je suis allée jusqu'à récupérer les chutes de la bordure grise du dos, qui ont été coupées à l'équerrage ! Fini, plus de ce tissu gris dans mon stock !

J'ai utilisé ma méthode préférée de finition tout machine : la bande est cousue sur l'endroit, puis rabattue dans le dos, épinglée pour que le bord rabattu recouvre la ligne de couture, et enfin cousue - toujours sur l'endroit - au ras du pli.

Dernière touche : broderie machine pour l'équivalent d'une étiquette. Je l'ai faite le long de la bande de finition, avec la fonction broderie de ma machine. C'est assez basique, mais j'ai pu faire une séquence de couture avec les prénoms et la date :


🔗 My favorite link parties
By the time I got to the backing, Shannon and Amanda's 30 Days of Improv challenge was in its 2nd week. It was one of the QALs I'd spotted on my list of upcoming challenges, and one I really wanted to be in.
And why not take the opportunity of this challenge to start improvising, and also use these blocks in a specific project? Let's go for a new adventure!
 J'ai ajouté des bandes, des courbes et autres astuces pour connecter les blocs les uns aux autres, j'ai aussi retravaillé certains blocs pour les améliorer. Et voilà le dos !
 |
| 👀 👉 Challenge Improv - 1 |
Les tissus sont pour la plupart les mêmes que ceux du devant, avec un turquoise qui n'a pas la même teinte, l'ajout d'un jaune pâle et de 2 gris assez proches l'un de l'autre. C'est aussi l'occasion d'utiliser les chutes !
Chaque semaine du QAL avait un thème, pour la première il s'agissait de jouer avec les rayures et rectangles, et la coupe à main levée. Très sympa à faire !
Pour lire en détail les réalisations, cliquer sur le lien sous la photo.
The fabrics are mostly the same as those on the front, with a different shade of turquoise, the addition of a pale yellow and 2 grays quite close to each other. It's also an opportunity to use up scraps!
Each week of the QAL had its own theme, and the first week was all about playing with lines and stripes, and freehand cutting. It was fun!
To read more about my work in progress, click on the link below the photo.
Semaine 2:
Week #2:
 |
| 👀 👉 Challenge Improv - 2 🅻 |
Semaine 3:
Week #3:
 |
| 👀 👉 Challenge Improv - 3 🔺 |
Semaine 4:
Week #4:
 |
| 👀 👉 Challenge Improv - 4 🔵 |
Une fois tous les blocs terminés, je les ai disposé sur mon mur et l'étape suivante a pu commencer : assembler ces blocs aux dimensions très différentes, dans un ensemble qui me paraissait cohérent.
Et aussi boucher les trous laissés par les formats variés !
Once all the blocks were finished, I laid them out on my design wall, and the next step began: assembling these very different-sized blocks into a coherent whole.
And fill in the gaps left by the different formats!

I've added strips, curves and other tricks to connect the blocks together, and I've reworked some of the blocks to improve them. And here is the backing!
⭐⭐🧷⭐⭐
L'étape du bâti s'est assez bien passée. Vu les dimensions de ce quilt, ça a demandé un peu d'organisation, de meubles poussés, et de mise à contribution ! François m'a aidé à positionner le molleton, et à le couper. Ensuite, pose de mon stock entier d'épingles à nourrice (environ 250 !), à quatre pattes par terre...
To make both sides the same size (with the backing a little larger for easier quilting), I added a gray border around the top, and on three sides of the backing.
The basting stage went fairly smoothly. Given the dimensions of this quilt, it required a bit of organization, pushed furniture and a lot of hard work! François helped me position the batting and cut it. Then it was time to place my entire stash of safety pins (around 250!), on all fours on the floor...

Now it's ready for quilting!
⭐⭐🌸⭐⭐
J'avais pensé à un quilting simple, en lignes droites le long des blocs. Et puis au hasard de mes navigations sur le net, j'ai vu ce motif de fleur, en ligne continue : Plumeria. C'est un modèle gratuit de Urban Elementz. Ah ben tiens, pourquoi pas ?
Je suis allée chercher une grande feuille de polypropylène dans un magasin de loisirs créatifs, rayon beaux arts, pour tracer en grand le motif et l'utiliser comme stencil.
Opération découpage au cutter, avec des "ponts" laissés pour que le motif reste attaché sur la feuille.
I had thought of a simple quilting pattern, with straight lines in-the-ditch along the sashings. Then, while browsing the net, I came across this flower pattern, in a continuous line: Plumeria. It's a free pattern from Urban Elementz. Well, why not?
I picked up a large sheet of polypropylene in a hobby store, in the fine arts section, to trace the pattern in large and use it as a stencil.
Operation cutter, with "bridges" left to keep the motif attached to the sheet.

🚩 Pour le prochain stencil que je ferais de cette façon, il faudra penser à couper les interstices un peu plus larges pour que la mine du crayon-craie puisse bien passer sans rester coincée...
🚩 For the next stencil I'll make this way, I'll have to remember to cut the interstices a little wider so that the chalk pencil lead can pass through without getting stuck...

Le crayon porte-craie est fourni avec des "mines" de craie blanche, rouge et bleue. La rouge se voit bien, même sur le tissu marron, et ne part pas facilement (il faut gommer ou laver pour que les lignes s'effacent).
En partant du centre du quilt, j'ai tracé une première ligne de fleurs, sur toute la largeur.
The chalk pencil comes with white, red, and blue chalk leads. The red one shows up well, even on brown fabric, and doesn't come off easily (you have to erase or wash to make the lines fade).
Starting from the center of the quilt, I traced a first line of flowers, along its entire width.

Avant de commencer à quilter, petit entraînement du mouvement des mains pour guider le quilt sous l'aiguille de la machine, en piqué libre, le long du tracé.
Tournez la tête vers la gauche, pour voir le tracé se former du haut vers le bas : c'est comme ça que j'ai quilté.
❓ Si vous n'avez jamais expérimenté le piqué libre, imaginez que la croix qui bouge dans l'animation ci-dessous, reste statique (= l'aiguille de la machine à coudre) et que c'est le support ( = le quilt) qui est déplacé sous la croix pour dessiner le motif (exemple cette vidéo, allez à 12:20 environ pour voir le mouvement du tissu sous l'aiguille).
Before I begin quilting, a little hand movement training to guide the quilt under the machine needle, in free-motion quilting, along the tracing.
Turn your head to the left to see the pattern coming from top to bottom: that's how I quilted.
❓ If you've never experimented with free-motion quilting, imagine that the cross that moves in the animation below remains static (= the sewing machine needle) and that it's the backing (= the quilt) that's moved under the cross to draw the pattern (for example this video, go to about 12:20 to see the movement of the fabric under the needle).
 |
| @Urban Elementz |
Pour ce motif, j'ai utilisé un fil Gütermann 65/2 marron, le même en bobine et canette.
Un fil polyester fin, très agréable, et qui se voit tout en restant assez discret.
For this pattern, I used a brown Gütermann 65/2 thread, the same one in spool and bobbin.
A fine polyester thread, very pleasant to quilt, which is visible yet discreet.

Ca n'a pas été une mince affaire de quilter ce grand ouvrage sur ma machine à coudre "normale" !
Les pinces à vélo pour maintenir le quilt enroulé pour passer sous le bras de la machine, et les gants de jardinage antidérapants pour que les mains agrippent bien le quilt sous l'aiguille ont été des accessoires précieux !
Malgré tout c'est un certain poids et volume à manipuler dans tous les sens, et c'est du sport !
It was no simple task to quilt this large project on my domestic sewing machine!
Bicycle clips to keep the quilt rolled up to fit under the machine arm, and non-slip gardening gloves to keep my hands gripping the quilt under the needle were invaluable accessories!
Still, it's a lot of weight and volume to handle in all directions, and that's sport!

Ok, le motif se voit un peu (surtout sur l'envers sur le tissu uni), mais mes ratés ne se voient pas trop ! C'est loin d'être aussi parfait qu'avec une machine à quilter, mais je suis assez contente du résultat et de mes fleurs "naturelles" (ça c'est sûr, il n'y en a pas 2 pareilles ! 😜)
Ok, the pattern shows through a little (especially on the reverse side on plain fabric), but my failures don't show through too much! It's nowhere near as perfect as with a long arm, but I'm pretty happy with the result and my "organic" flowers (no two are the same, that's for sure! 😜)

Détail du quilting sur l'envers :

Détail du quilting sur l'envers :
Quilting detail on backing side :

Le quilting terminé, il ne reste plus qu'à équerrer et faire les finitions. C'est un quilt réversible qui ira sur notre lit, donc pas de manchon de suspension à prévoir.

The quilting done, all that's left is squaring, then finishing. This is a reversible quilt for our bed, so no hanging sleeve is required.
⭐⭐🧵⭐⭐
J'ai rassemblé mes dernières pièces de tissu gris pour faire la bande de finition. Et quand je dis dernières, c'est que je suis allée jusqu'à récupérer les chutes de la bordure grise du dos, qui ont été coupées à l'équerrage ! Fini, plus de ce tissu gris dans mon stock !
Voilà la bande de finition coupée à 2.5'' de largeur et pliée en deux, et normalement (si mes calculs sont bons) assez longue pour faire tout le tour du quilt (doigts croisés...)
I gathered my last pieces of grey fabric to make the binding. And when I say last, I mean I went so far as to rescue the scraps of gray trim from the back, after the quilt had been squared! No more of that gray fabric in my stash!
Here's the finishing strip cut to 2.5" wide and folded in half, and normally (if my calculations are right) long enough to go all the way around the quilt (fingers crossed...)

J'ai utilisé ma méthode préférée de finition tout machine : la bande est cousue sur l'endroit, puis rabattue dans le dos, épinglée pour que le bord rabattu recouvre la ligne de couture, et enfin cousue - toujours sur l'endroit - au ras du pli.
Fin du suspens : la bande est juste assez longue, il me reste 10 cm non utilisés ! 😁
I used my favorite machine binding: the strip is sewn right sides together, then folded over at the back, pinned so that the folded edge overlaps the seam line, and finally sewn - still right sides together - along the fold.
End of suspense: the binding is just long enough, I have 4'' left unused! 😁

Dernière touche : broderie machine pour l'équivalent d'une étiquette. Je l'ai faite le long de la bande de finition, avec la fonction broderie de ma machine. C'est assez basique, mais j'ai pu faire une séquence de couture avec les prénoms et la date :
Final touch: machine embroidery for a kind of label. I did this along the binding, using the embroidery stitches on my machine. It's pretty basic, but I was able to make a sewing sequence with the first names and the date:

⭐⭐💙⭐⭐
Patio, 81'' x 76'' (206 x 193 cm), 2024
Piécé et quilté à la machine
Modèle de Happy Zombie
Quilt réversible
Temps de réalisation : 118 heures
Pieced and quilted by machine
Pattern by Happy Zombie
Reversible quilt
Completion time: 118 hours
------------------------❤-------------------------
🔗 Rejoignez-moi du samedi au mercredi pour la Patchwork & Quilts link partie
Join me from Saturday to Wednesday for the Patchwork & Quilts link party 🔗
------------------------❤-------------------------
🔗 My favorite link parties
Commentaires
J'ai une préférence pour l'envers
Bisous et bonne soirée
Bisous bisous!
Le choix de le broderie des fleurs a été très judicieux! Bravo Frédérique!
Quilter ces fleurs a dû être très sportif, mais ce motif tout en courbes est le contrepoint idéal de tes carrés
Le plus dur est à venir : choisir quelle face exposer... Heureusement, tu pourras le retourner à l'envi !
Merci pour le rappel de sa construction. Courageuse pour son quilting.